How to Safely Can Chicken Soup
Canning chicken soup allows you to prepare a nutritious and delicious recipe in advance and keep it in storage for over a year. The process is very simple, and you can start adding chicken soup to your stockpile by following a few basic steps. Look at the recipe below and see how easy it is to make your own batch today.
Ingredients:
4 quarts of chicken broth
4 cups of cooked chicken that has been chopped
4 cups of vegetables of a mixture of celery, carrots and onions
A couple of cloves of minced garlic
Seasonings to taste
You will need a pressure canner for this recipe, and it’s important to let it heat up while you are preparing the ingredients. It’s also important that the jars are sanitized and hot before filling as well. You can use quart or pint jars depending on your needs, but keep in mind that the soup will need to be eaten right away after opening. You can refrigerate the opened jars for a couple of days, but remember that you may not be able to count on refrigeration during a survival situation.
![]()
Preparing the Ingredients

Wash and peel all of the vegetables and dice them into sizes of your choice and mince or use a press for the garlic. Place all of the vegetables in a stockpot, along with the broth, and cook for at least 5 minutes. You can also add the seasonings and herbs now, or wait until you are ready to process the cans. A word of caution while using herbs: They tend to get stronger over time while in storage, so use them judiciously in order to prevent them from overpowering the flavor of the soup later.

Finally, shred or cut the cooked chicken into pieces and remove any fat or skin from the meat.
![]()
Processing the Soup

Add the chicken in equal amounts to each heated canning jar. Next, use a slotted spoon to add and evenly-distribute the vegetables between the jars as well. All of the ingredients combined shouldn’t fill up the jars more than half way. Next, carefully pour the broth into each jar until 1 inch of headspace remains. Remove any air bubbles and add more liquid if necessary. You can also use boiling water to top off jars if you start to run low on broth.
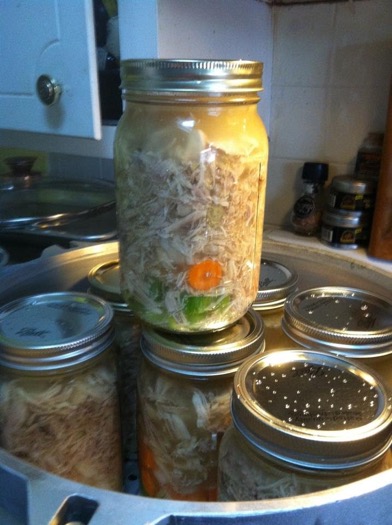
Wipe down the rims with a damp cloth or paper towel and attach and secure the lid assemblies. Place in the pressure canner and put on the cover. Allow the canner to heat and vent steam for 10 minutes before attaching the gauge and sealing up any vent holes. Don’t start the timer until the canner has fully-pressurized to 10PSI for weighted gauges and 11PSI for dials. Make sure that you adjust for altitude. Standard processing times for quart jars is 1 hour and 30 minutes and quarts will need 1 hour and 10 minutes.

Once finished, turn off the heat and depressurize the canner. Don’t open the lid until the pressure has reached zero. Remove the jars, place on the counter and let them cool overnight until they reach room temperature. Check the jars for any damage or defective seals and re-process them as necessary. Label and date the good jars before storing them in a cool and dark place. Rotate out supplies as necessary, and expect the soup to have a shelf life of at least a year if all goes well.
One thing to keep in mind is that fat will congeal and float to the top of the jars. While a little bit of fat shouldn’t be a problem, it’s a good idea to skim the broth or chicken after cooking, but before using it in this recipe. This will eliminate most of the fat and lead to a healthier finished product. Try this method with your favorite chicken soup recipe, and see how this delicious, nutritious and filling comfort food can enhance the quality of your food stockpile.