Identifying and Using Pressure Points to Control Bleeding

![]()
Head Wounds

For wounds to the head or scalp, feel for the pulse in the temple on the affected side. Once located, make a fist and stick your thumb out. Firmly press your thumb into the temple until the bleeding subsides. Apply only enough pressure to control bleeding, and use caution if that side of the head is fractured. You can also take some cloth bandaging, fold it up to increase padding, and place it against the temple to provide pressure as well.
For wounds at or below the eyes, feel for a pulse that is situated along the jaw at a point between the teeth and the middle of the jawline. Apply pressure to the area until bleeding is reduced. Take care when working with a patient who has a broken jaw in order to prevent further damage, and use your other hand to provide some additional support to stabilize the area while you apply pressure.
![]()
Neck and Shoulder Wounds

There are two main arteries along the sides of the neck that can be depressed to control bleeding. However, you should never apply pressure to both of them at the same time. Cutting off circulation of the carotid arteries will cause the patient to quickly lose consciousness as their brain is deprived of oxygen. Press the artery on the affected side of the neck by depressing the pad of your thumb into the artery until bleeding is controlled. Switch thumbs as each one becomes sore and tired in order to maintain consistent pressure.
For shoulder wounds, feel for a pulse just above the collar bone of the affected side. It is located in the patch of soft tissue that exists between the collar bone and shoulder muscles. You will need to apply firm pressure with your index and middle finger to find the pulse, and even more pressure will be required to control bleeding. The easiest way to control bleeding in this area is to place your hand over the shoulder, with the thumb over the artery and grip tightly.
![]()
Arm Wounds

For wounds that are situated between the shoulder and the elbow, feel for a pulse just below the bicep. Apply pressure by gripping your hand around the bicep and squeezing firmly. Make sure that you apply pressure at a point above the injury, not below.
For wounds of the lower arm, extend the arm and feel for a pulse along the bend above the elbow. This is the place where we get stuck for blood tests. Hold the elbow in your hand while you apply pressure with your thumb. You can also depress your index and middle finger over the area and accomplish the same result.
For wounds of the hand, feel for the pulse in the soft tissue above the wrist. There will be two pressure points on either side of the lower arm. Squeeze firmly with your thumbs while supporting the top of the wrist with your fingers.
![]()
Leg Wounds
The femoral artery is one of the hardest to locate, and it is situated along the inner thigh, starting near the groin area. Once you locate the pulse, place your hand around the waist area of the patient, just at a point above where the leg extends from the groin. Your fingers should be on the backside while your thumb is in front. Squeeze firmly until you apply enough pressure to control bleeding. You can also kneel next to the patient and take the ball of one of your hands and press firmly into the area with your other hand on top. Think of how you position your hands during CPR. Lean into the leg with the weight of your torso while your arms are locked straight.
For wounds at or below the knee, feel for a pulse along the inner leg just next to the knee area. Hold the leg straight with one hand by cupping the outer area of the knee while applying pressure to the area with the knuckles of your free hand. Use all four fingers for maximum pressure.
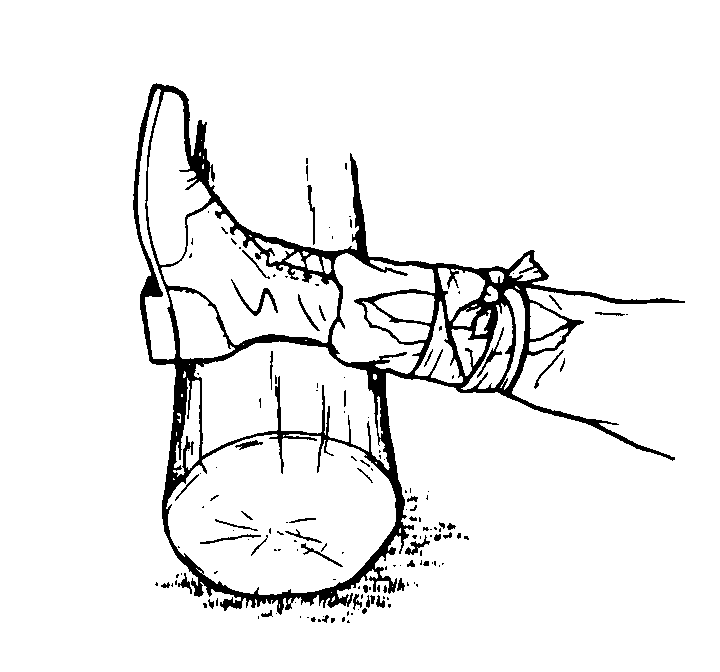
For foot wounds, grasp the soft tissue behind the ankle bone on the heel-side of the foot with you fingers. Cradle the toe-side of the foot with your thumb and squeeze your hand firmly until bleeding subsides.
Keep in mind that for bleeding in the extremities, you can elevate the affected area above the heart while applying pressure. You can also take some bandaging and fold it over to create padding and use that as a way to enhance pressure as well. Depress the bandaging into the pressure point and squeeze firmly.
Remember that controlling bleeding is paramount to survival. Patients with severe injuries can lose a lot of blood very quickly, go into shock and die. Using pressure points is one of the most effective ways to control bleeding in specific areas, and they help to avoid the need to apply a tourniquet, which is seen as a last-ditch effort to save someone’s life.
You can also practice locating these pressure points with the help of a volunteer, and you can also locate some of them on your own body as well. Keep in mind that the more you practice now can translate into rendering life-saving aid in the field more quickly and effectively.