How to Make Homemade Fermented Hot Sauce
Chili Peppers

The first thing that you need to consider is whether you want the sauce to be green or red and spicy or mild. Red and yellow chilis are commonly used to make red sauces whereas green ones go into green sauces. Sounds logical, right? Green chilis tend to be milder and more earthy in flavor. Red chilis tend to be hotter and leave the distinctive vinegary-bite and aftertaste that many of us are familiar with.

Keep in mind that different chilis produce different levels of heat, and the heat primarily comes from their seeds and oils. Do some research, tinkering or dip into your treasure-trove of experience to choose the best chilis that will make up the backbone of this recipe. No matter what you decide, you can always modify the heat content by adding or removing seeds as you are preparing the peppers. Just remember that it’s easier to add seeds and heat than it is to remove from the sauce. Start gingerly and add as necessary as you experiment with different batches.
Take the fresh chili peppers and cut off the tops. Then cut each pepper into three sections that are relatively equal in size. Pack the pieces loosely into a mason jar.
![]()
The Brine

Any fermented food option from pickles to jalapenos involves the use of a brine solution. Brine is easy to make. A common ratio is to add 3 tablespoons of salt for every quart of water. Mix thoroughly and then give the salt water a good shake before pouring over the chili peppers in the mason jar. Make sure that you prepare enough brine to fill the jar and completely cover the peppers. Cover with a cheesecloth or loose-fitting lid that will allow some of the air to escape during the fermentation process.
![]()
Maintenance

Place the jars on the counter in a conspicuous location so that you don’t forget they are there. You want to flip them over and give them a good shake at least once a day to ensure that the minerals that are resting on the bottom get distributed throughout the peppers. This daily flip will also help to prevent the formation of mold as well.
It’s important to be patient as the fermentation process can take anywhere from one to three weeks. As time progresses, the liquid in the jar will become more and more cloudy. This is a byproduct of the fermentation process and also indicates that the contents of the jar are ready to be processed.
![]()
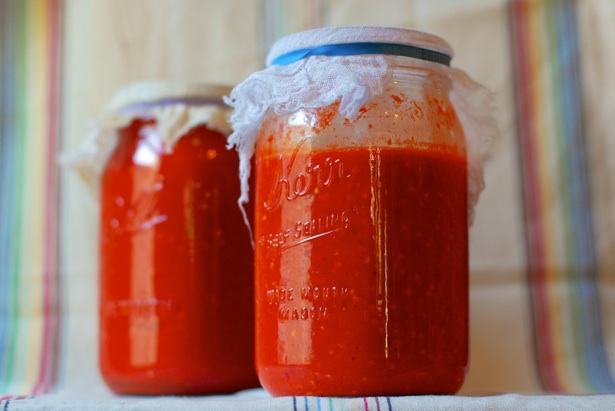
Preparation

Carefully pour out the brine in the jar and place in a new container. Pour the peppers into a blender and add just enough brine to help the peppers to become pureed. Continue to add brine and blend until the sauce develops the consistency that you prefer. Just remember that more brine will lead to a sauce that is thinner whereas less brine will produce a thicker product. It is rare that you will need to use all of the brine.
Add some apple cider vinegar to the sauce after it has been blended to give it a little acidic bite and tangy flavor. A couple of teaspoons per jar should be enough, but free to use more or less depending on your tastes and preferences.

Attach the lid, label the jar with the date and store in a cool, dry place. This sauce can keep for months in dry storage and even longer in the refrigerator. Try it out for yourself and feel free to experiment with different types of chili peppers and seasonings until you get the perfect sauce. This simple recipe will definitely add some kick to any meal, and it makes the perfect companion to incorporate into any survival food stockpile.