5 Gallon Bucket Rainwater Collector and Filtration System

There are a lot of systems that can be built to harvest and filter rainwater, and some are more practical than others. You want one that will give you a decent amount of capacity while also being relatively compact and easy to build. Let’s take a look at an example of a simple system that you can put together in an afternoon with some basic material.
![]()
Required Items
3 Five gallon buckets with lids
1 spigot
5 lengths of ½ inch diameter PVC pipe
4 elbow joints
Epoxy or PVC fittings, washers and nuts
Dremel or tool to cut holes
1/8” drill bit
Activated charcoal
Sand
Gravel
Fine gravel
![]()
The Basic System
You have a lot of flexibility in terms of how to build this system, but it’s important to get a sense of the basics first. You will use three 5 gallon buckets to fashion a rainwater collector, filter and clean water dispenser. The PVC pipe will be used to connect each section together as well as to make an injector in the bottom of the filter bucket. You want to stack these vertically or mount them on platforms of some sort so they are next to each other at different elevations. It’s easier to do the latter in terms of efficiency, but you can also use the direct stacking method as well because ultimately, it’s gravity that makes this system work.
The first step is to prepare the rainwater collection bucket. You should drill a series of holes in the lid so that rainwater can go in and debris gets filtered out. You can also cut out the inner-portion of the lid and attach a screen to capture more water at a faster rate. The next step is to bore a small hole along one of the walls about ¼ to ½ inch above the bottom. This will ensure that most of the rainwater will flow from the collector into the filter. Take a small section of PVC pipe and insert it into the hole and seal it with epoxy or a fitting, washer and nut. Attach an elbow joint to the outside end.
To make the filtration bucket, cut two holes for the inlet and outlet pipes. Make one in the top cover of the bucket about an inch from the edge. The bottom hole will be where the rainwater enters, and the top will be where the filtered water exits into the dispenser. This may sound backwards, but there is a good reason for doing it this way, and we’ll get to that a bit later. Repeat the step outlined for the first bucket to create the outlet pipe and elbow joint.
To make the inlet pipe for the filter, you want to have a pipe along with the elbow joint to connect to the rainwater collection bucket. However, you also want to insert a length of PVC pipe inside of the bucket near the bottom as well. Drill a series of holes into this section that will spray water through the bottom layer of filtration material. The easiest thing to do is attach the pipe to a connector and screw it in place so that it rests just above the bottom of the bucket. The reason you want to have this improvised “sprinkler” is so that the water gets evenly distributed through the filtration material and minimizes clogging.
Finally, make another hole near the top and bottom of the dispenser bucket. Attach the elbow joint and pipe to the top, and then attach the spigot with a nut and washer assembly on the bottom hole.
![]()
Creating the Filter
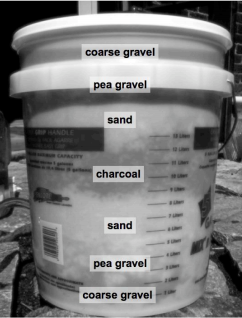
You want to arrange the filtration material properly in order to maximize its effectiveness. Each layer of material should be about 3 inches deep. Start filling the filtration bucket AFTER you have installed the inner injection pipe. Pour in a layer of the coarse gravel followed by fine gravel. Then, add a layer of sand and then a layer of activated charcoal. Add a layer of fine sand above the charcoal, followed by a layer of sand, fine gravel and coarse gravel again.
Using this pattern will accomplish a couple of things. First, it will minimize clogging. Second, it will start to remove larger, then smaller particles from the water as it passes up through the system. The upper layers will serve as an additional level of protection while preventing fragments of charcoal and sand from exiting the filter and into your dispenser bucket.
![]()
Assembling the Units
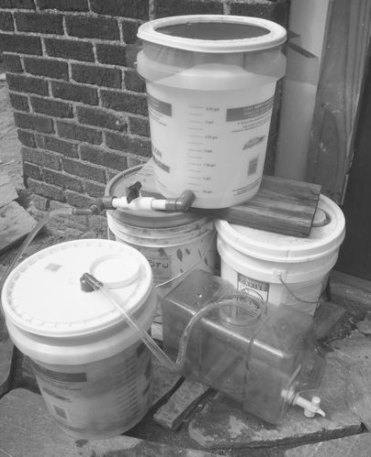
It’s important to align each bucket before securing the pipes with epoxy. This will allow you to make any adjustments as necessary. Again, you have plenty of room for improvisation and can customize the design based on your needs, space requirements and amount of PVC pipe available. Simply attach the pipes to the respective holes and you’re good to go. Run some water through the system to check for leaks, and make sure that you have enough space to collect the water from the spigot.
One important reminder: The charcoal will need to be replaced every 1500 gallons or so, and the other material should be replaced once they start to show signs of degradation. This may be from the formation of slime or sludge, discoloration or a coating of mineral deposits. However, keeping the charcoal fresh is the most important aspect of this system as it is the charcoal that filters out the majority of the contaminants.
With this in mind, using the staggering method instead of the stacking can make it easier to access the filtration bucket and swap out the material. You also want to make sure that you don’t seal all of the pipes and joints so that certain sections can be removed and re-assembled. Use your own judgment to decide what you want to permanently attach and what segments you want to be able to separate.
Finally, this filter works best in periods of heavy rainfall as water will fill the top bucket and push water up through the filter. If you don’t get a lot of rain, you can reverse the filter so that the water drips through the top and comes out the bottom. However, this option is more prone to clogging. In any case, this is an excellent way to turn rain into potable water that is perfect for any home, shelter or semi-permanent bug out location.
